Shanghai JetCutt Cutting Tools Co., Ltd. Loding...

From Carbide Blank to Finished Insert: JetCutt's Manufacturing Process

From Carbide Blank to Finished Insert: JetCutt's Manufacturing Process

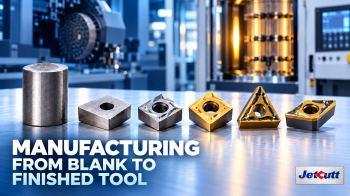
A carbide insert is not defined by its grade code alone. Its performance depends on the carbide blank, grinding accuracy, edge preparation, surface cleanliness, coating route, inspection and packaging. This article explains how JetCutt turns carbide blanks into finished cutting inserts for practical turning, milling, threading and parting applications.

Quick answer: A finished JetCutt insert moves through controlled blank selection, double-face grinding, peripheral grinding where required, edge passivation, wet-blasting pretreatment, cleaning and drying, PVD or CVD coating, post-treatment, final inspection and packaging.

Why the Manufacturing Process Matters

Two inserts with the same nominal shape can perform differently when substrate preparation, edge condition or coating adhesion varies. Dimensional accuracy affects seating and repeatability. Edge preparation affects sharpness and chipping resistance. Surface cleanliness supports coating adhesion. Final inspection connects each control point to the product received by the customer.

JetCutt's Carbide Insert Process at a Glance

Stage Main purpose Control focus
1. Blank selection Start with a suitable cemented-carbide blank Specification, batch identity and incoming condition
2. Double-face grinding Establish thickness and reference surfaces Thickness, flatness and parallelism
3. Peripheral grinding Complete outside geometry where required Profile, corner form and edge condition
4. Edge passivation Prepare a controlled cutting edge Consistency, sharpness and edge security
5. Wet-blasting pretreatment Condition the surface before coating Uniform surface and protected geometry
6. Cleaning and drying Remove residues before coating Cleanliness, drying and handling
7. PVD or CVD coating Apply an application-matched coating route Recipe, loading, coverage and traceability
8. Post-treatment Refine the coated surface Surface appearance, edge protection and cleanliness
9. Inspection and packaging Release a consistent, traceable insert Dimensions, appearance, marking, quantity and packing

1. Carbide Blank Selection and Incoming Control

The process begins with a carbide blank that matches the insert family, geometry and application route. Batch identity and incoming condition are checked against the production requirement. Unsuitable or damaged blanks are separated before they enter later operations, protecting both efficiency and traceability.

2. Double-Face Grinding

Double-face grinding establishes the reference surfaces used by later operations and by the toolholder. The objective is controlled thickness, flatness and parallelism so the finished insert seats consistently. Stable grinding conditions, coolant management and scheduled inspection help prevent dimensional drift.

3. Peripheral Grinding Where Required

Some insert models require peripheral grinding to complete the outside profile, corner geometry or functional edge form. This is a model-specific delivery item and should be confirmed against the product requirement rather than assumed from the insert code alone.

4. Edge Passivation and Cutting-Edge Preparation

Edge passivation, also called controlled honing, balances cutting sharpness with edge security. The correct edge condition depends on insert geometry, workpiece material, chipbreaker and cutting stability. The goal is a repeatable edge, not the largest or smallest hone in every application.

5. Wet-Blasting Pretreatment

Before coating, the carbide surface is prepared through wet-blasting pretreatment. A controlled surface condition supports coating adhesion and protects the functional geometry. Current cutting-tool research continues to examine how substrate pretreatment affects surface integrity and the coating interface, reinforcing that this stage is a functional control rather than cosmetic finishing.

6. Cleaning and Drying Before Coating

After pretreatment, inserts are cleaned and dried. Oils, particles, moisture and handling residue can interfere with a stable coating cycle. Clean transfer and complete drying reduce the risk of contamination entering the coating equipment.

7. Selecting the PVD or CVD Coating Route

JetCutt uses PVD or CVD routes according to the insert application and product solution. Coating should be considered together with substrate, edge preparation, chipbreaker and cutting conditions.

Decision factor Why it matters Verify
Workpiece material Materials create different thermal, abrasive and chemical loads. ISO group, hardness and condition
Cutting stability Continuous and interrupted cuts stress the edge differently. Rigidity, impact, vibration and coolant
Insert system Geometry, chipbreaker and substrate work as one system. Complete designation and application
Required improvement Tool life, chip control and finish require different balances. Wear pattern and controlled test result

8. Post-Treatment and Cleaning

After coating, inserts may receive wet-blasting post-treatment and are cleaned and dried again. The result should be a consistent finished surface while protecting the cutting edge and removing process residue. Excessive treatment can alter an edge; insufficient treatment can leave an inconsistent surface.

9. Final Inspection, Marking and Packaging

Final checks may include dimensions, profile, edge condition, coating appearance, marking, quantity and package integrity. Correct labels and batch information support traceability and make application feedback easier to act on. Packaging is part of product control, not an afterthought.

Quality Checkpoints

  • Before grinding: confirm model, blank specification and batch.
  • After grinding: verify reference surfaces, thickness and profile.
  • Before coating: confirm the surface is clean, dry and correctly prepared.
  • After coating: verify route, appearance and batch record.
  • Before shipment: confirm marking, quantity, packing and product identity.

Frequently Asked Questions

Does coating alone determine insert performance?

No. Coating works together with substrate, geometry, chipbreaker, edge preparation and cutting conditions.

Why is cleaning before coating important?

Residue, moisture and particles can interfere with a stable coating cycle. Consistent cleaning and drying help the substrate enter the equipment in a controlled condition.

Is peripheral grinding required for every insert?

No. It depends on the insert model and delivery specification.

Can manufacturing guarantee the same tool life in every machine?

No. Workpiece material, hardness, setup rigidity, cutting data, coolant and chip control also affect tool life. A controlled application test remains necessary.

Need application support?
Send JetCutt the workpiece material, hardness, insert designation, cutting conditions and current wear problem for a practical product and process review.

Conclusion

A reliable carbide insert is built through a connected process: the right blank, controlled grinding, repeatable edge preparation, clean surface treatment, an application-matched PVD or CVD route, post-treatment, inspection and traceable packaging. JetCutt uses this process-based approach to support consistent carbide inserts for turning, milling, threading and parting applications.

Related JetCutt resources: Technical Overview · Quality & Supply · All JetCutt Products

Technical References

  1. Sandvik Coromant — How carbide inserts are made
  2. Seco Tools — What Do Coatings Do?
  3. Surface pretreatment methods for cemented carbide substrates of coated cutting tools.
  4. Advanced ceramic multilayer coatings for increasing the tool life of cutting tools.

General manufacturing information only. Actual process details and acceptance criteria depend on the insert model, substrate, coating route and applicable quality requirements.